Showing posts with label DIY. Show all posts

Monday, November 9, 2015

DIY Solar Mason Jar Lanterns

**This blog uses affiliate links and may receive a small commission for clicks and/or purchases from such links. 
Thank you in advance for any such clicks or purchases**


I did this little project on a whim after seeing that you could purchase solar light mason jar lids 3 for $20! (and that was supposed to be a good deal) I LOVED the idea but quickly thought of a cheap hack for it. 

The Dollar Store sells tons of little solar light trinkets for a DOLLAR! LOL. 

Below is a quick picture tutorial but basically I took the plastic solar tulips, cut out the solar device, cut a hole in the mason jar lid, inserted and glued into place the solar device and put the lid back on the jar!! SIMPLE! 

And you really could dress up the jars however you want. Here I just painted the lid, partially filled the jars with pebble glass, and used twine to hang them. I'm thinking they'll look awesome on the porch too. 

A couple more close ups in the dark and light. 
       

Happy Holiday Crafting!
-----------------------------------------------------------------------------------------


Groopdealz
Pin It

Thursday, November 5, 2015

DIY Cage light

Seriously, I'm stuck in DIY mode right now. This one has been rolling through my head for a while now and since I just finished my dining set, I couldn't stand the thought of still having the old gold chandie in there so I went for it. Going from 6 light bulbs to one was a big concern for me but it actually turned out awesome and with the right bulb there is still a good amount of light. 

So I didn't do an in depth tut but there are pictures to give you the jist of how it was done. 

Supplies Needed:

1 random light kit
(I got it from Lowes on clearance for $11)

1 Cute wire basket thing
(I got mine from a home furnishings store- Boulevard- 
with a coupon from when we moved so it was FREE)

1 roll of twine 
($1 section of Target)

Scissors
glue gun
dremmel
(or some other object to cut a hole in metal)

Total Cost was $12!
 (Minus the cost of the light bulb)
    

I wish I could take pictures as well as I could craft! 
I love the twin wrapped around the cord- it adds the right amount of rustic nautical to the room. 

*Please forgive the uneven layout. Sometimes blogger(or THE blogger) doesn't work as expected-
I like to call it LIFE. Imperfect and somewhat unpredictable but great still the same*


Pin It

Tuesday, November 3, 2015

Dining Set Before/After Pics!

**This blog uses affiliate links. See the Privacy Tab for more info. Thanks! ____________________________________________________________________________________________

I'm so excited to reveal my new dining set! 
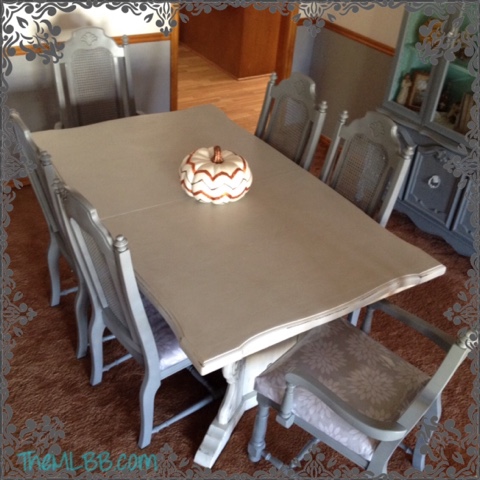
By new, I mean reclaimed, beautified, old 80's dining room set! It only took me over two years of owning it to get to painting it... and 2 full days of sanding, cleaning, painting, sanding, painting, upholstering and cleaning again to get it done but IT. IS. DONE. YAY!

Check out the Before:


And here's the After
(with LOTS of close ups!)


I sanded the top all the way to the bare wood so the wood grain would still show through with the help of General Finishes milk paints. The top is seagull gray and the base is antique white. I lightly distressed the top and left the base a bit more distressed looking, which was easy to do with this awesome paint! (This is my first go with milk paints) They are pretty great for antiquing and distressing projects.


For my chairs, I actually used a Krylon spray paint in a darker gray. Not much option in spray can paint as far as shades of gray- but I like the contrast with the table. Then they were sealed in with a Rustoleum clear top coat. Spraying dining chairs is much better than hand painting...so much better!
I left them nice and clean, no distressing. It's all about balance right? The seats got reupholstered with a fresh new fabric and clear vinyl(because seriously, I've got kids).

Now onto that wood trim and carpet!
(accept I think I'll wait on changing the flooring until all kids are potty trained and mess free, 
is that even possible?!!!)

I can't stop staring at my dining room now! It feels so close to complete! 


Pin It

Wednesday, October 28, 2015

I'm still here!

I've been neck deep in some DIY projects and haven't had time to post anything! I'll try to get my projects up soon. They are amazing, if I do say so myself! Want a sneak peak??

Pin It

Wednesday, September 23, 2015

Aged Perfection: Part 2

**This blog uses affiliate links. See the Privacy Tab for more info. Thanks! _________________________________________________________________________________

UPDATE:
The Piano Tuner came... and then I cried! Bad news... way more costly to get it properly tuned than we had figured in or can afford. {Let me go cry some more}
So we did the only thing we could do. Sell it. It's gone.
This lovely set up is no more.

I sure hope the new owners can take good care of it. It's awesome.
On to the search for a piano again. Good bye lovely.


Aged Perfection Part 2!

I went for option 3! 
It's all finished. I have to admit it was the easiest choice. I love the natural distressing on it and preserving is pretty simple.

1) I used the foam sand blocks {Love the sand blocks!} to remove the chippy paint-you can see just how raised and chippy some of the paint was in the before pictures!


2) I wiped it clean of any dust and debris as best and quickly as I could.
3) Then I sealed it in with General Finishes flat clear top coat- 3 coats. It didn't even need sanding between coats. Sweet!

It just glided right on with the cheap craft foam paint brushes. I did rinse them out a couple of times during the process as there was some discoloration coming from the brush picking up the wood color and some inevitable left over dirt. 

The wood went so much darker and the surface is much smoother and set to be more durable now! I really love the dark and light contrast it has. 


A big 'Thanks' to General Finishes for the sample kit I received in the mail. I'm a believer in your top coats for sure! I have done waxing top coats, which aren't bad and have their place, but I don't like having to polish it up, I didn't have to with the GF top coat, at least not on this project. 

**I was given a free trial kit from General Finishes. I was not paid by General Finishes for any relating posts. All opinions expressed in this post are my own. 
Pin It

Thursday, September 17, 2015

TONIGHT! FREE Home Depot DIY class: Fall wooden pumpkin candy holders

**This blog uses affiliate links. See the Privacy Tab for more info. Thanks! ________________________________________________________________________________
Check out your local Home Depot for fun and free DIY instruction classes.

Tonight, at many locations, you can learn how to make this cute pumpkin candy(or magazine or plant) holder! (You can buy the supplies there to actually make it.)

Here are the details for the Southern Utah  locations. You'll need to register ahead of time too. 
So fun!

Pin It

Wednesday, September 16, 2015

Aged Perfection Sings to me!

**This post may contain affiliate links. Such links may provide a small commission. Thank you in advance for any clicks or purchases from my affiliate links. I try to provide you with only the best of links with products I love and think you will too.
 _________________________________________________________________________________
Who loves natural aged perfection? And Pianos?! ME! 

I got lucky with this one. Within minutes after seeing it posted for sale I immediately got in touch with the seller and set up the arrangements to pick it up. Right after I did that, she got tons of offers higher than mine on it. So sad. But she was kind enough to let me know and I hurried down to check it out and paid a little bit more, which is totally ok because I love it. I loved it from the start. 
I'm lucky my husband wanted it too!

We've been searching for a piano so our children can learn to play for over a year! We just couldn't get to them before everyone else did. I wanted to know about the age of the piano so I got as much info as I could. The serial number inside the piano dated it back to 1986. Then when I saw it in person, there was another serial number on the music backing(where the music books sit) that did not match the inside. It dates back to 1940. That means someone rebuilt it. Pretty cool!

My first instinct was to just leave it as is. Then when I got there and looked closely, I saw it would need some help. The paint was is chippy and some pieces of wood are missing.

I went through a whole debate in my mind...  

1) Strip it completely and paint it?  
2)Lightly sand the chippy paint off the top and paint the rest? 
3) Or lightly sand it all and seal it in so that no more paint chips off?

Which do you think I chose?

Stay TUNED for the after shots!! Side NOTE: anyone know a good piano tuner in Southern Utah? 
I know I know, my jokes often fall FLAT... Oh I'm just killin myself here! Ha! Ok, I'm done. 

 {BTW my dining room set just took a backseat to this piano project.}


Pin It

Friday, September 11, 2015

Outdated Lighting? A little DIY project...

**This post may contain affiliate links. Such links may provide a small commission. Thank you in advance for any clicks or purchases from my affiliate links. I try to provide you with only the best of links with products I love and think you will too.
 _________________________________________________________________________________

All-Area Lighting Sale

I feel like a lot of my posts about my home start with... "When we bought our home I knew I'd change THIS"

So a little background on our home might help. It's OLD! And ORIGINAL everything! It's really in pretty good condition considering it's age but... being 31 years old and original(just like me- haha) it needs some updates. Between the honey colored cabinets, trim, and flooring... the very gold lighting throughout the house, murky "oat" white paint, and brass door knobs...
I KNEW a lot would CHANGE!

Some things needed to be changed completely while others could simply be refreshed.

We spent a couple hours(by we... I mean my husband and his brother who happens to be an awesome electrician)... changing out lights and fans.

I could scour the internet and find amazing lighting with abundant price tags but of course, that's not in my budget.

Here's where my DIY comes in...

PAINT THOSE GOLD FANS YO!

I used to sit and stare at these fans hanging in my house and wonder if they were real gold- they are that shiny people! Of course I knew better, especially because when we took them down... some of the "gold" was peeling off. Ha!

I should have gotten an awesome shot of them while they were still hanging but nope... didn't do it.

Here is the best I have as a before shot. 

And here's the current after shot... 
They are going to be hung in our sunroom... it's hot up in there.
{Yup, I went gangsta, which is sooo NOT me but I'm in a mood}

I used Rustoleum high gloss white spray paint from Lowes. More cans than I like to admit... It took almost a full 4 cans... or was it 5? I know I made multiple trips to the store though... {Hate that}
When they are actually hung I'll take some more pictures for you! I can already tell I'll love them!
Pin It

Monday, August 31, 2015

Sneak Peak! Upcycled Dining Set.

**This post may contain affiliate links. Such links may provide a small commission. Thank you in advance for any clicks or purchases from my affiliate links. I try to provide you with only the best of links with products I love and think you will too. _____________________________________________________________________________________________

I'm seriously excited!!! 
I got an awesome surprise from General Finishes in the mail after a rather exhausting day!

{is it just me or are Fridays tough after making it through the rest of the week? Everyone seems to praise Friday's but my favorite day is Sunday!}

This totally made up for it though!

I have been doing lots of paint projects in the home lately. Remember my China hutch? Ya I still have one more to go. And my end tables? And my door? Oh and the trimming on my home! Yup I've been busy painting. But I also have this rather awesome dining set that I have been trying to decide exactly how I want it. It's got a design on top that I will enhance or just completely cover. {No going in between here} The base has great details that I want to for sure bring out. As for the chairs... I know how I want them, just have to find the right fabric for reupholstering them. That'll be a first for me too! 

I'll give you a hint on my design plan... Antique white an Seagull gray!

Thank you General Finishes for the sample box! 

Stay tuned for the After Shot! This will be my first time using milk paints. 
Ready to learn with me?

Pin It

Tuesday, August 25, 2015

Picking a Paint Color for Your Front Door


It's officially been two years since we bought our home! 
{Where did the time go?!}

Among the many projects I knew I wanted to tackle after moving in was painting my front door!
I LOVE statement doors! I have many pins dedicated to choosing the right paint color and how to paint your front door. I'm the kind of person who has to gather waaayy too much information before deciding what to do. Kind of seems like a time waster but in the end it's really beneficial because I learn great techniques and new tricks as well as making a solid decision that I hopefully love for a long time. See how cute all these ideas are??

We seem to be having a slew of random house projects popping up- not the fun kind either. I don't like that kind of stress so I resort to my therapeutic PAINTING in those stressful times. I must have been waaay stressed because I not only painted the door but my whole entryway too! It finally got a fresh crisp white coat- no more old yellowish off white. I'll show that off later!

As for the door, I quit being wishy washy and just went for it. I already had this paint color on hand from one of the amazing Ace Hardware free paint days for Clark + Kensington flat paint. I'm a huge fan. Clark + Kensington knows how to make paint with great coverage and less dripage. So this project was FREE! LOVE THAT!

Anywho, what do you think?? I'm loving the color contrast between the scrolly white screen door and the turquoise behind it! The panels to the side also have the same white scrolly metal "screen" so I'm debating on painting the inside of the side panels to match the door. But maybe that would be too much turquoise?? 

I also need a cute Welcome mat to match! Any suggestions on finding a budget friendly but adorable mat? 
Pin It

Tuesday, August 4, 2015

Lemons=Lemonade so broken screen door=picture frame? Obviously! A DIY Pallet Wood Project

So ya know the old saying... "If life gives you Lemons... make lemonade." 

Here is my DIY-er version... "If your house gives you a broken screen door... make a picture frame!"

 It just so happens that is has been quite windy this summer and our back screen door got blown right off (bad) but it somehow left one piece of glass unbroken(good)! Way to stay positive right?

I also seem to be a collector of pallet wood and most of it is still sitting in my back yard... time to start really putting it to good use. 

So with a little imagination, one disassembled pallet, some screws, a couple ceiling fan braces and even a strike plate(to hold the glass in place).... we ended up with THIS!! 

The great part is I didn't even cut a piece of wood to make it. The sizing and placement turned out perfectly for me. 

Feel free to pin and share with a link back to this post. Thanks so much!
Pin It

Friday, July 24, 2015

Hutch #1 is DONE! A Chalk Paint makeover

Remember when I showed you my honey oak EVERYTHING?? Well, not much has changed yet... Except for one China hutch. It has a totally new look! 1980 something look was replaced with a clean light cool toned color scheme making a hug difference. I hear angels singing when I look at it! 

Here are some close ups!


All filled in and lit up. I love it!!

Now onto the next project!

Pin It

Wednesday, July 22, 2015

DIY TIP: Perfectly clean caulking line + how to fill in gaps

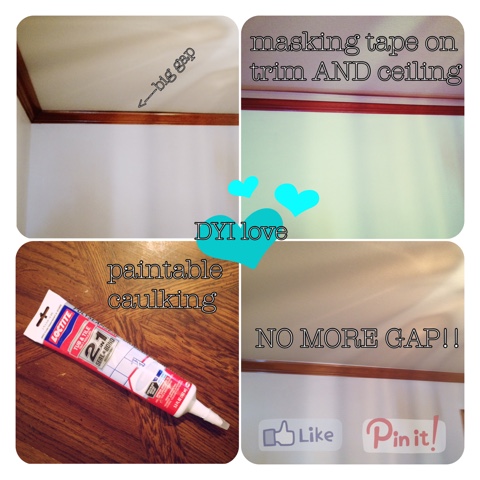
Hi all! Long time no see... Uh...rrr... I mean type? Blog? Well, however you say it, I have been starring at this HUGE gap between the crown molding and ceiling in  our dining room for way too long! It's not nearly as noticeable in the picture though.

It bugged me from day one of being in our new home but alas it was NOT near the top of our to do list. Well, today, after a very eventful morning, I found myself sitting in the afternoon once again starring down the GAP! Dark ugly space where bugs can hide... Or even a mouse??!! Ok probably not but my dear husband spotted, caught, and discarded our first mouse ever today so I have creepy crawly things on the mind. Yuck!!! Probably why I HAD to fix the gap PRONTO! 

(P.S. If you have a mouse issue- buy the sticky trays! Totally worth it!)

So it's pretty easy to get a straight caulking line if you didn't know! Took me some learning at first but I've got it down now.

Here are my quick steps:
(as shown in the pictures)

Step 1: tape off the trim AND the ceiling(or wall if that's what you are working with) Make sure to lay the tape straight(no wrinkles in it) 

Step 2: Use PAINTABLE caulking. Cut the small tip off at an angle. There are usually 3 little cutting lines on the top, big to small, you want the smallest. Trust me. Do a little length of caulking then smooth it out with your finger-yes they are they best tool for this. You'll quickly noticed just how much extra is on your fingers, add that to the uncaulked area...no wasting here.

Step 3: Pull off the tape BEFORE caulking is dry. This ensures a nice smooth line! Then stare at that gorgeously straight caulking line and NO more gap! 

**if your gap is as big a mine was, you'll need to do a second(maybe even third) line of caulking after the first. 

Now Go! Fill those gaps!!!
Pin It

Saturday, February 28, 2015

To gel or not gel? Big question!

All of you fellow furniture DIYers know about the chalk paint phenomena(so amazing what that stuff can do) but do you know much about the gel stains yet? 

I've been researching gel stains a lot because:

1)My house is crawling with honey oak everything(the carpet even seems to be honey oak color).

2)We are on a budget and a full remodel is out of the question

3)My very talented sister told me about how gel stains are simple to use. Not much prep with fantastic results.
(and the buzz in furniture redo land is General Finishes gel stains are top notch)
What do ya'll think about their gels?

So for fun, I'm going to show you some of my chalk paint projects that are done and some projects that are patiently their turn for a fresh new look. You may recognize some of them.

Anyone recognize my chevron wall? Wow!! That was a good five days work and I love it! The shelves are made of old wood ski's and are painted with a creamy white chalk paint. That cute little bench was done with a lemony yellow chalk paint. I do love this part of my home!
Just need to get that antique rocking chair refreshed, haven't decided just the right look yet. My cute hanging basket thing needs better placement but until I figure that out, he's happy hanging out of reach from the little ones.
This is my entryway. Mirror Mirror on the wall, you are the prettiest of all my projects! LOVE my mirror that now matches my little yellow bech. The table was once a yucky oak color too... Thank you chalk paint for your help here... And some fabric covered inserts give it extra flair, I can switch 'em out when I want to.
TILE YOU MUST DIE... But not today.
This lovely dining set has so much character yet to be revealed. And OH look at that hutch!!! We were lucky enough to obtain these pieces with the purchase of home... Keep scrolling to drool even more...we have another hutch and two end tables(French provincial!!!) and even an entire bedroom set of French provincial furniture(not pictured) that we got with the home. Yes my heart skipped a beat when I saw the beauties and found out the owners were going to sell them anyway.
This is the big decision maker here, I really want to stain our kitchen floors and cabinets!!! I would LOVE TO SEE and hear tips on the best way to stain the floors. 
From all that I have read, cabinets are pretty easy to stain(yay!) which is good because this is the smaller portion of my kitchen cabinets. That tile needs some tlc too. 
The second China Hutch is my next project... Think a nice cool gray with a pop of color in the back and creamy white distressed hardware!!! Ahhh!
I'm also thinking of doing a shade of gray for the end tables-there are two-with a yellow top?? (And I am soo not referencing that grimey aweful terrible book that somehow is being made into a movie- scum of the earth I tell ya!) 


See that honey oak carpet I mentioned earlier?! Can I stain that?! LOL!!! 

So what do ya'll think? 
Stain at all or Stain it all?!! 

Moment of Honesty:
I LOVE MY HOUSE! My family is sooo beyond blessed to have what we have and I'm happy with many parts that guests may not be(it's all about loving what you got). I am not going to have all these projects done today or tomorrow but a plan will help get them started. Projects are also a HUGE stress reliever for me- gets my creative side going!

**Editors Note: my pictures were quick snap shots from my iPhone... no judging! :)
Pin It